
This is one that I know a lot of you have been looking forward to – the fitting of Sriracha’s SS Tuning flares! While this wasn’t the mini ST’s only update for this season, I think it’s safe to say that it received the most attention from friends and other enthusiasts. Predicting that there’d be a lot of interest in the flares – and the process of fitting them – we made sure to document it properly for the site, especially as we knew we’d be taking a slightly different approach to how most, if not all other, SS flare installs have been carried out.

By far, the most commonly-asked question regarding Sriracha’s flares was one that may be surprising to some of you: “why did you cut the fenders?”.

For those that don’t know, by design SS Tuning’s flares are meant to simply fit over top of the factory fenders (and quarters, if doing rears) meaning that no cutting has to be done, but that results in one issue – if the car has been aggressively lowered then they won’t be fully functional as flares! It’s great if you don’t want to cut up your car, but it then means that you either need wheels that are hellasunk (is that still a used term?), a 4×4 stance, or some combination of the two. Obviously, we had other ideas in mind…
Additionally, Mario’s decision to go with flares was not one based on aesthetics, or at least not primarily. He actually did need the extra room under the fenders given his wheel fitment and relatively wide tires, so flares were decided upon as the solution; as opposed to an aggressive pull perhaps, or new wheels and tires.

There are a few options for flares but SS’s won out for being the right width – they were wide enough to give him the room he needed (20mm), but not so wide as to look awkward without a matching rear pair of flares – and the lack of visible hardware which would offer a cleaner look.

The second most common question, incidentally, would be why Mario only ordered front flares. For starters, that’s all he actually needed as the rear tires clear just fine and it’s a FWD car anyway, but also because fitting rear flares is a much more involved job. Fenders are one layer of metal so all you have to do is cut them and then seal/finish the exposed metal edge. Quarters on the other hand are made up of two (or more) layers of metal so once cut they have to be welded back together, sealed extra well to avoid rust, and on cars like Sriracha you may have to deal with the rear doors as well. Given the extra cost, complexity, and irreversibility of fitting rear flares – and the fact that Sriracha is winter driven so we’d have to extra vigilant about the welding and sealing – it was decided that the rears would stay untouched. Besides, we figured that it would (and it did) make for a cool look by having the car be purposely mismatched front to back in terms of both wheels and flares.


With all of that out of the way, let’s get to the actual process now, shall we? The flares ended up arriving just a couple of weeks before iMSS; it was perhaps a bit close but we weren’t worried since we’d taken on larger projects before (*cough* engine swap *cough*). Anyway, Mario mocked them up as soon as they arrived, confirmed that they were good to go out of the box, and then immediately dropped them off for paint and paint protection film (PPF).
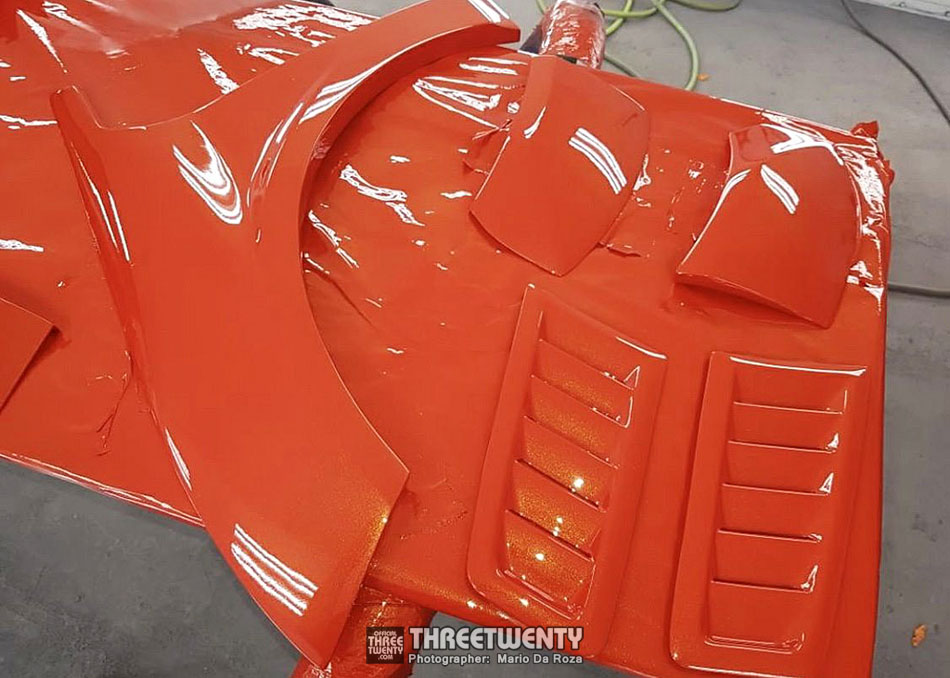
The flares weren’t the only pieces to get painted however, as along with them he also dropped off some hood vents. STs of course generate a lot of heat in their engine bays, and especially as he’d already experienced insane temps driving to California last year he wanted a way to expel some of that hot air. During this year’s trip to Cali he (and Derrick) once again met up with José and picked up the vents from Tabasco; they were the style that Mario wanted, and it’d allow part of the car to live on up here.


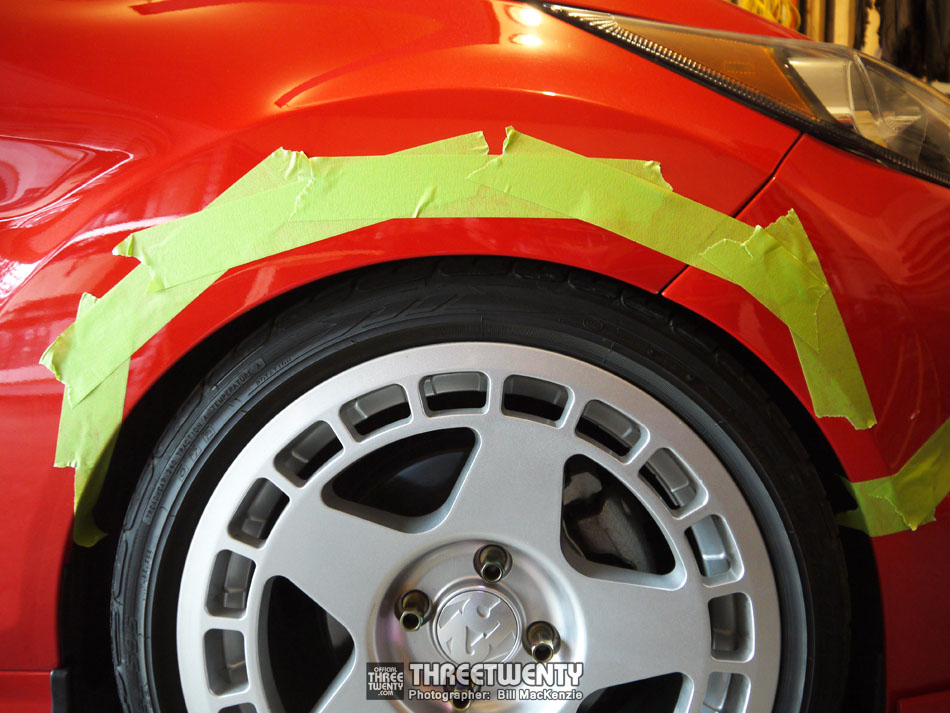
Before long the parts were back from paint and he wasted no time in getting to work preparing for their install. Derrick and I met him at his house where Sriracha was waiting, in the garage, with flares on the table and masking tape denoting what was about to be cut off. It’s worth noting that none of us had fitted flares to a car before so this was somewhat uncharted territory; but we’d seen enough installs to know the procedure and given that we were only doing front flares, we didn’t have to worry about any welding or sealing of quarter panels as mentioned.

With everything prepared Mario decided to get a live feed running in time for the sparks to start flying…and soon they did.


After the first slice into the metal we figured that hearing was a valuable sense so a quick supply run was made for some better ear protection – and bubble tea – before cutting continued. Mario didn’t need to take a ton of material out so the cut was made along the first body line of the fender, and a similar one made on the bumper to match. The first pass, as shown in the first two photos, was a bit of a test to get a feel for the process which is why the cut was made a bit below the tape line.

Before long we were ready to bond the first flare on so the surfaces were cleaned, prepped, and the adhesive applied. Mario was doing a final test-fit here; before the flare was permanently bonded in place some more masking tape was put down on the fender to outline where it’d sit, to work as a guide for placing it. Once the adhesive was on we wouldn’t be able to move it around much, so we took our time beforehand to ensure that its exact placement was clearly marked. We also went and removed any PPF that would be covered up by the flares so that we’d be bonding straight to the factory paint for the best possible hold; it would also mean that should any PPF need to be removed in the future, none of it would be pinned under a flare.


It wasn’t too long before that first piece was bonded in place, and so the process was then repeated to attach the finisher to the front bumper as well. At this point we decided to call it a night and leave the second flare for the following evening (this took place over a weekend so Sriracha wasn’t going anywhere); we didn’t want to make too much noise that late at night and frankly, we wanted to see if the first flare would still be on the car come morning. Haha.


The second night, the first flare was still securely bonded to the fender so we took that as a sign we knew what we were doing and went ahead with the passenger side. Kanji also stopped by this time; he of course has had experience with the fitting of his Aimgain kit which was definitely a more involved procedure than what we were taking on, so it was nice to have him assisting.

The procedure was the same, but a bit quicker this time around due to having already done it once; mark, cut, clean, bond flares, thin edges down. Please don’t mind the very Aimgain-style, angular tape guidelines. Mario was cutting across the first bodyline in the fender as mentioned but the tape was a nice, and more visible, backup guide for the cuts.

The car with a bit of its bodywork missing; cutting up to that first line may not seem like a lot, but it offered more than enough clearance for the wheels and tires.

One additional step we took during the install was to drill some holes to allow the fender flare and bumper finisher to be bolted together. By running hardware through the two pieces it would not only ensure a nice tight panel gap but also keep them perfectly flush with one another for a tidier appearance.


Given that we’d “learned” how to do this the first night, this time around I was standing back and taking many more photos to capture some of the steps that I hadn’t previously. Here Mario was offering the flare up for a final test-fit before then cleaning the panel and applying adhesion promoter.


Masking tape was then used once again as a guide for placing the flare before the double-sided tape and adhesive were applied and the flare was stuck in place. By doubling-up like this we had the extra-strong adhesive to assist in bonding the flare to the car, and the tape would effectively serve as a “fence” to keep it from accidentally oozing out past the seam. You may also spot a bit of foam tape applied to the edge of the flare; this was done as a preventative measure – even though the flare and finisher would be bolted together – to prevent the two pieces rubbing and damaging the paint since there was no PPF in the seam.


Finally, Mario opted to run a bolt through the bottom of the flare into the fender as yet one more way to secure the two together.

One more shot to show the width of the SS Tuning flares; 20mm, as mentioned previously. Also, note that hole drilled into the end of the flare.


Finally it was time for the passenger side bumper finisher to be prepped and bonded in place, but the install wasn’t over yet.

I’d quickly mentioned it before but now it’s time to address in more detail what I meant by “thinning down” the flares’ edges. As SS Tuning’s flares are designed to be bonded over the intact factory panels they have rather large inner lips to serve as another point of contact with the fenders and quarter panels of the vehicle. Not only was there nothing for these lips to attach to on Sriracha, since the fenders had been cut back, but that cutting would have all been for nothing if the tires fouled on the flares instead; we’d effectively be back to square one.


Mario promptly got to work, cutting and grinding the inside edge to gain back the needed room under the arches. In a perfect world, yes, this would have been done before paint but as it was on inside edges that’ll never be seen it wasn’t necessary to have a perfect, seamless paint finish. Additionally, with the time frame we had to work within and our schedules, the flares had to be dropped off for paint as soon as they arrived in order for this to all be carried out in time for iMSS.

It wasn’t my focus of this photo when I took it – hence why I hadn’t focused on it – but you can see the cut inside the driver’s flare here and how much thinner the top of the flare’s lip is as compared to the side.


This was definitely the messiest part of the process…

With the fenders cut back, flares bonded on, and thinning carried out, the next step then was of course to take advantage of the extra space now available. One (pricey) option would have been to order new wheels, but especially given the time constraints that wasn’t viable. Mario instead was able to source a set of 15mm spacers to push out the existing Turbomacs; with the flares themselves being 20mm wider each he was able to keep a fitment somewhat similar to what he’d started with, but with an extra 5mm of clearance when all was said and done…


…and before anyone freaks out, prior to all of this he had longer studs pressed in to the hubs so that there’d be no danger in running such a thick spacer.

However, the spacers were left off at this point; Mario saved them for the weekend of iMSS (and the Thunderbird Club Show and Shine) just because Murphy’s Law would see a sneaky pothole send a tire into the flare and crack it the day before the shows otherwise.


By now it was once again late at night so we put away the loud tools, but Mario wasn’t intending to cut his hood for the vents anyway so that was a job for the following day regardless. With the flares there had been some margin for error in regards to the cuts; with the hood vents however, the cuts would directly dictate where they sat and so Mario let the team at Garage Box take on that responsibility.

Along with having the hood vents fitted, that following week Mario also went and took a cue from Nakai-san by running a bead of silicone across the seams of the flares and finishers to seal everything up and finish off the install.

It took some guts to cut into a still fairly-new car (it’s a 2016!) but the flares and vents drastically changed – and improved – not only the mini-ST’s appearance, but the latter have definitely helped with underhood temperatures as well. There was a slight worry leading up to the shows that time might be too tight to carry out the surgery but fortunately everything worked out and Sriracha was not only sporting flares and hood vents, but a couple more new parts as well. Those however, will be looked at in the car’s next update on the site; this is where I’m going to wrap this one up for now. Thank you for reading, and we hope that this was helpful for anyone who is considering SS Tuning – or frankly any – flares for a FiST, FoST, or other vehicle.
-Bill
EXTRAS:


