I can’t help but have flashbacks to a certain entry I’d written on Ketchup back in 2016, as I sit here and try to get this one underway. A lot can happen between the time photos are taken and when they wind up going live, and there’s a lot still to happen between this entry and the eventual Part 2.
Before we get ahead of ourselves though, we should rewind a bit and give a proper introduction to this story. What you’re looking at in these photos is Keith’s newest project, a Tuxedo Black Fiesta ST. Long-term readers may recall his Mazda 3 from a handful of years back, and following that he found himself in a new-gen Taurus albeit relatively briefly. In fact, I want to say I only ever saw it in person once and maybe have all of two photos of it in a folder, somewhere on my hard drive? Regardless he ultimately found himself back in a hatchback, this time the little FiST you see here.

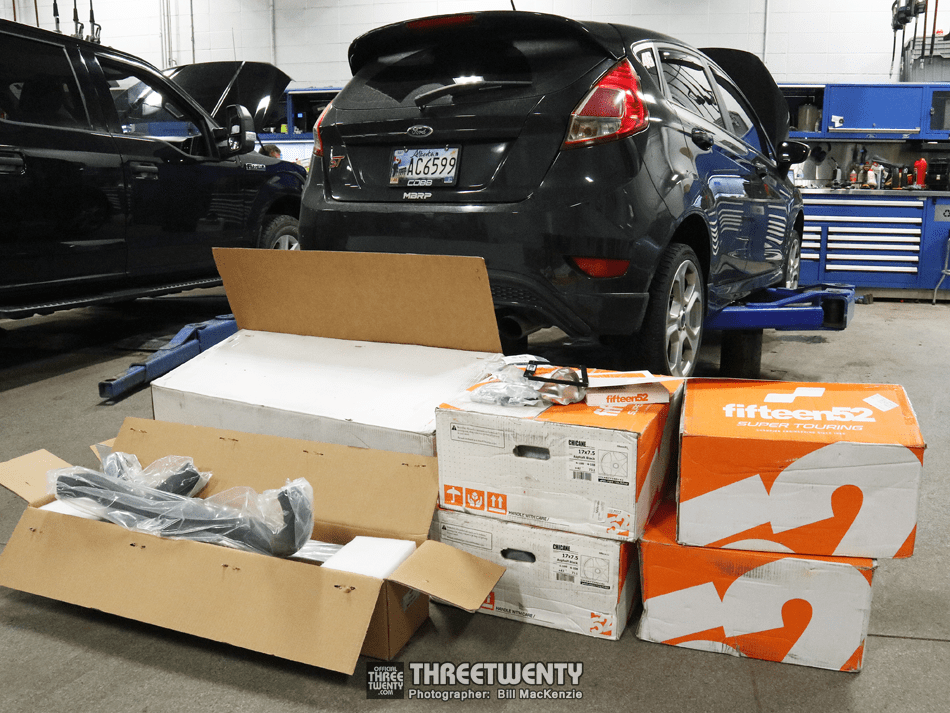
Obviously these little go karts are wonderful platforms to build upon and Keith himself wasn’t hesitant to get to work on this particular example, ordering quite a collection of parts in rapid succession to one another and having them all fitted over a fairly short period. These photos today are of the first round we could call it, when the car saw a handful of performance upgrades (including wheels and tires) ahead of a more cosmetic-based series of installs later on – that’ll be Part 2.
The bulk of this round of work was carried out at my shop for reasons of scheduling, convenience, and us not wanting to crawl on my garage floor to wrestle with bolts under a car any more than we had to. Not to mention the new tires had to be mounted anyway. Keith had already started tinkering on the car but items like exhausts aren’t the most fun with jackstands!

Anyway, the first step was to open everything up and check it over, plus set aside all of the freebies and extra bits that were sent along with the parts…you’ll see that stencil put to work in the next update.

The little ST was then promptly put in the air and over the course of a couple of days in the shop received some of the go-to bolt ons that always produce good results. Making a FiST Even More Fun, 101.

Obviously an exhaust was always going to be part of the equation, with Keith opting for an MBRP unit.

Further up a new COBB motor mount replaced the original, though this is something Keith had handled ahead of the car coming in (along with a COBB intake and setting up the Accessport).


Along with these, a new COBB intercooler replaced the much smaller original piece while new charge piping was fitted to match. Of course, these hard parts were also paired with a tune so the car could truly take advantage of them.

However the real stars of the show this time around were the new shoes. It had taken quite a while for these to come in so Keith and I were very eager to see them on the car.


Keith had opted to order in 17″ Chicanes from fifteen52 – to have something a little more unique than the common Tarmacs or Turbomacs (ahem) – and in their Asphalt Black finish to fit with the black paint of the car itself.

That being said, he wasn’t wanting to go with a full murdered-out look and so also ordered in a few extra pieces to add a bit of colour.


I took a lot of photos – the packaging was rather nice and I couldn’t resist. Haha
Deciding to use blue as the accent colour, Keith opted to replace the standard black hex nuts and center caps with blue offerings instead and as you’ll see in a moment it was a brilliant call!

I made sure to keep an eye on the car and popped back a few times during the day to grab a quick photo here and there of it going together; here the wheels were going on, wrapped in their new 205/40 Advan Flevas. Incidentally, some super short lug nuts had to be ordered to fit under the large central covers of the wheels. The first short set wasn’t quite short enough…

Covers on, hex nuts secured, job done.


And with that, round one of the Fiesta’s modifications was complete! The blue of the hex nuts and caps broke up the black just enough, and if you knew what to look for you could get the hint that there were some parts underhood. Overall it remained very subtle though and that’s where the next round of modifications came in, all to be properly highlighted in Part 2 as mentioned.
As for an eventual Part 3 however, at the time of writing this it could still go one of two ways: continued work on this specific chassis, or a “soft reboot” with work continuing on another. All of the photos shown today and those of the next round were all captured and saved to go live after we had completed preparing for, participating in, and providing coverage on, Driven. Unfortunately, very recently the Fiesta you see here was hit by another driver (100% the other party’s fault) and is currently awaiting a final verdict on its future; the good news though is that Keith is okay and more or less has plans in place with his next moves ready regardless of what the final call is.
As for why we’re carrying on with these two posts despite the current state of the car, we were very pleased with how it came together (to say the least) and even if this car can’t continue on and effectively has to be cloned with another chassis, we wanted to share the build that did take place. As well – most importantly – all of the photos from this round as well as the next had been surprises for Keith. Save for one or two teasers he hadn’t seen anything I’d taken ahead of time and so is seeing these for the first time alongside the rest of you reading this the day it goes live. Not wanting to just arbitrarily pick a date for this post if I could help it, prior to the incident I’d already allotted this day for Part 1 as it happens to be Keith’s birthday, and figured that’d be the perfect time to start publishing these. I hadn’t told him those specific plans but he was okay with the photos still going up despite the current unknowns, and so I decided to carry on with that original idea.
Happy Birthday Keith, we’re all glad you’re okay buddy.
-Bill
Great write up dude, and a very welcome surprise!